Uncategorized
arnold on Apr 09, 2025
Facebook has quietly become a powerful platform for short-form content. If you’re building a content creator channel and already active on Instagram or TikTok, your Facebook page should mirror that presence. But posting and managing content on Facebook works a little differently—and that includes scheduling.
This guide walks through the step-by-step process of uploading your first reel, adding captions and music, and scheduling future posts using Meta’s built-in tools.
Step 1: Access Your Facebook Creator Page
Make sure you’re logged into the account that owns your content creator page. This should be the same account you used when you created your page earlier in your content strategy.
Once logged navigate to your Facebook content creator page (not your personal profile). It will be on your left sidebar. You can click on pages to find it but it should be right there in your shortcuts. My page is called Digital Marketing Professor which you can see in the screenshot below so I will click that to open my business page.

Step 2: Upload and Customize Your Reel
When you’re on your Facebook content creator page, you’ll see two options for posting: you can either post directly from the page itself or click into Meta Business Suite. Posting directly is faster, but it’s more limited—especially when it comes to scheduling and managing multiple pieces of content. For more control and flexibility, it’s better to use Meta Business Suite. From your page’s left-hand menu, click on Meta Business Suite to get started. That’s where we’ll go next.

Click on “Create Reel.”

After selecting “Create Reel,” you’ll be prompted to upload your video file. You can upload up to three clips, but in most cases, you’ll just use one.
 After the video loads, you’ll see options to:
- Write a caption: Keep it brief, on-brand, and informative. If you’re stuck, you can use a tool like ChatGPT to brainstorm first-line hooks or hashtags.
- Add a thumbnail: Either select a still from the reel or upload a custom image for consistency across your feed.
- Tag collaborators: Optional, but useful if you’re working with other creators or brands.
- Enable or skip polls, playlists, or closed captions depending on your strategy.
Fill out what you need to and click Next.
Step 3: Add Audio (If Your Reel is Silent)
If your uploaded reel doesn’t have any sound, Facebook will automatically prompt you to add music.

This feature is built into the reel creation screen. You can:
- Browse Facebook’s licensed music library
- Preview audio tracks and align them with your visuals
- Adjust the mix between original audio and added music
This step is optional, but especially helpful if your reel would otherwise feel flat or silent on autoplay. You can also skip this if you’ve already added voiceover or music in an external editing app.
Step 4: Set Publishing Options
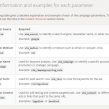
This is the final screen before your reel goes live—or gets scheduled. Facebook includes a range of options here, and while not all are required, it’s worth understanding what each one does.

Publishing Options
- Share now: Posts the reel immediately to your page.
- Schedule: Lets you select a specific date and time to publish later. Ideal for planning ahead.
- Save as draft: Stores your reel so you can come back to it later. Nothing is published until you return and click “Share.”
Optional Settings
- Add to Playlist: Organize your reels by topic or series. Great for grouping related content.
- Add Poll: Adds a basic interactive poll to your reel. Useful for engagement and feedback.
- Closed Captions: Automatically generates captions. Recommended for accessibility and silent viewers.
- Allow Remixing: Lets other creators remix your reel. Turn this off if you prefer more control.
- Allow Embedding: Allows your reel to be shared on other websites. Generally best left on.
- Allow Gifts: If monetization is enabled, this lets viewers send Stars or gifts.
- Audience Visibility: Choose between Public (default) or restrict by age/location.
Once all of these are set, click either Share or Schedule depending on how you want to publish it. If scheduled, your reel will appear in your Meta Business Suite calendar under “Planner.”
Step 5: Schedule Future Content with Meta Business Suite
To schedule multiple pieces of content—including reels and image posts—you’ll need to use Meta Business Suite.
- From your Facebook Page, click Meta Business Suite in the left-hand menu (or go to business.facebook.com)
- Click on Planner
- Select Create Post or Create Reel
- Upload your content and add a caption
- Choose your publishing date and time using the calendar
- Make sure your scheduled posts are visible in the Planner
You can schedule both reels and image posts this way, spacing them out across the week.
Why This Matters
Learning to schedule content is a core part of managing any serious content channel. It helps you stay consistent, reach audiences when they’re active, and avoid the burnout of posting in real time. These are the same tools used by professional social media managers—and they’re free and accessible if you know where to look.