Uncategorized
arnold on Oct 30, 2024
**Updated 2.24.2026***
Opening a Facebook Content Creator Page can be a powerful way to share your work, build an audience, and grow your personal brand or business. Whether you’re a video creator, influencer, artist, or simply looking to connect with a wider community, a creator page on Facebook offers tools that make it easy to reach and engage your audience: in-depth analytics, monetization options and content customization.
This guide will walk you through each step to get your page up and running. Let’s dive in so you can start building a space where your content truly shines.
Before you begin: You need to open a Facebook account if you do not have one. Use a throwaway email if you do not want a Facebook account.
How To Create A Facebook Page For Content Creators
When on the homepage of your Facebook personal page, look on the left sidebar for the PAGES section.gmail.com

From the Pages section, click Create new Page.

Click GET STARTED

Next we need to choose the name, category, and bio of the page. These elements shape the first impression people will have of your page and influence how it shows up in search results. Here’s how to get each part right:
Page Name
Your Page name should be clear, memorable, and aligned with your brand. For a content creator page, this might include your own name or a descriptive title related to your niche (like “The Digital Marketing Professor”). Avoid overly complicated names or symbols, as these can make it harder for people to find and recognize your page.
Keep it Simple: A concise, relevant name is easier to search for and remember.
Stay On-Brand: If you have an existing online presence, use the same or a similar name to create consistency.
Avoid Special Characters: Stick with letters and spaces to keep it readable and professional.
Category
The category you select helps Facebook understand your page’s focus and match it with relevant searches. For most content creators, categories like “Digital Creator,” “Video Creator,” or “Public Figure” work well, depending on the nature of your content.
Be Specific: Choose the category that best matches your content type. Facebook allows you to select more than one if applicable.
Research Similar Pages: Check out pages in your niche to see which categories work best for creators like you.
Update if Needed: You can always adjust this later as your content evolves.
Bio
Your bio is a quick snapshot of what followers can expect. Keep it short and to the point, highlighting your content’s value. Avoid unnecessary jargon or filler phrases. Instead, focus on key topics, your unique angle, and what viewers can gain from following your page.
Keep it Brief: Limit it to one or two sentences that summarize your content and audience value.
Use Keywords: Incorporate relevant terms (like “social media marketing,” “AI tips,” or “digital marketing”) to improve visibility.
Showcase Your Style: If humor or a specific tone is part of your brand, make sure that comes through here to connect with the right audience.
Taking the time to fine-tune these basics can help set your page up for success and attract followers who resonate with your content.
The image below shows how I set up a Digital Marketing Professor Channel.

In the next step, you can add details like contact information, location, hours, and even a website link if needed. For contact info, consider carefully whether or not to include an email address. If you decide to add one, avoid using a personal email; instead, create a dedicated email for your page to maintain privacy and a professional appearance. Alternatively, you might skip the email option and rely on Facebook’s messaging feature for direct communication. Since we are creating a content creator account we do not set any hours and we do not set a location as we want our content to show nationally rather than local.

Create A Facebook Cover Image With Gemini
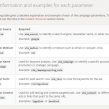
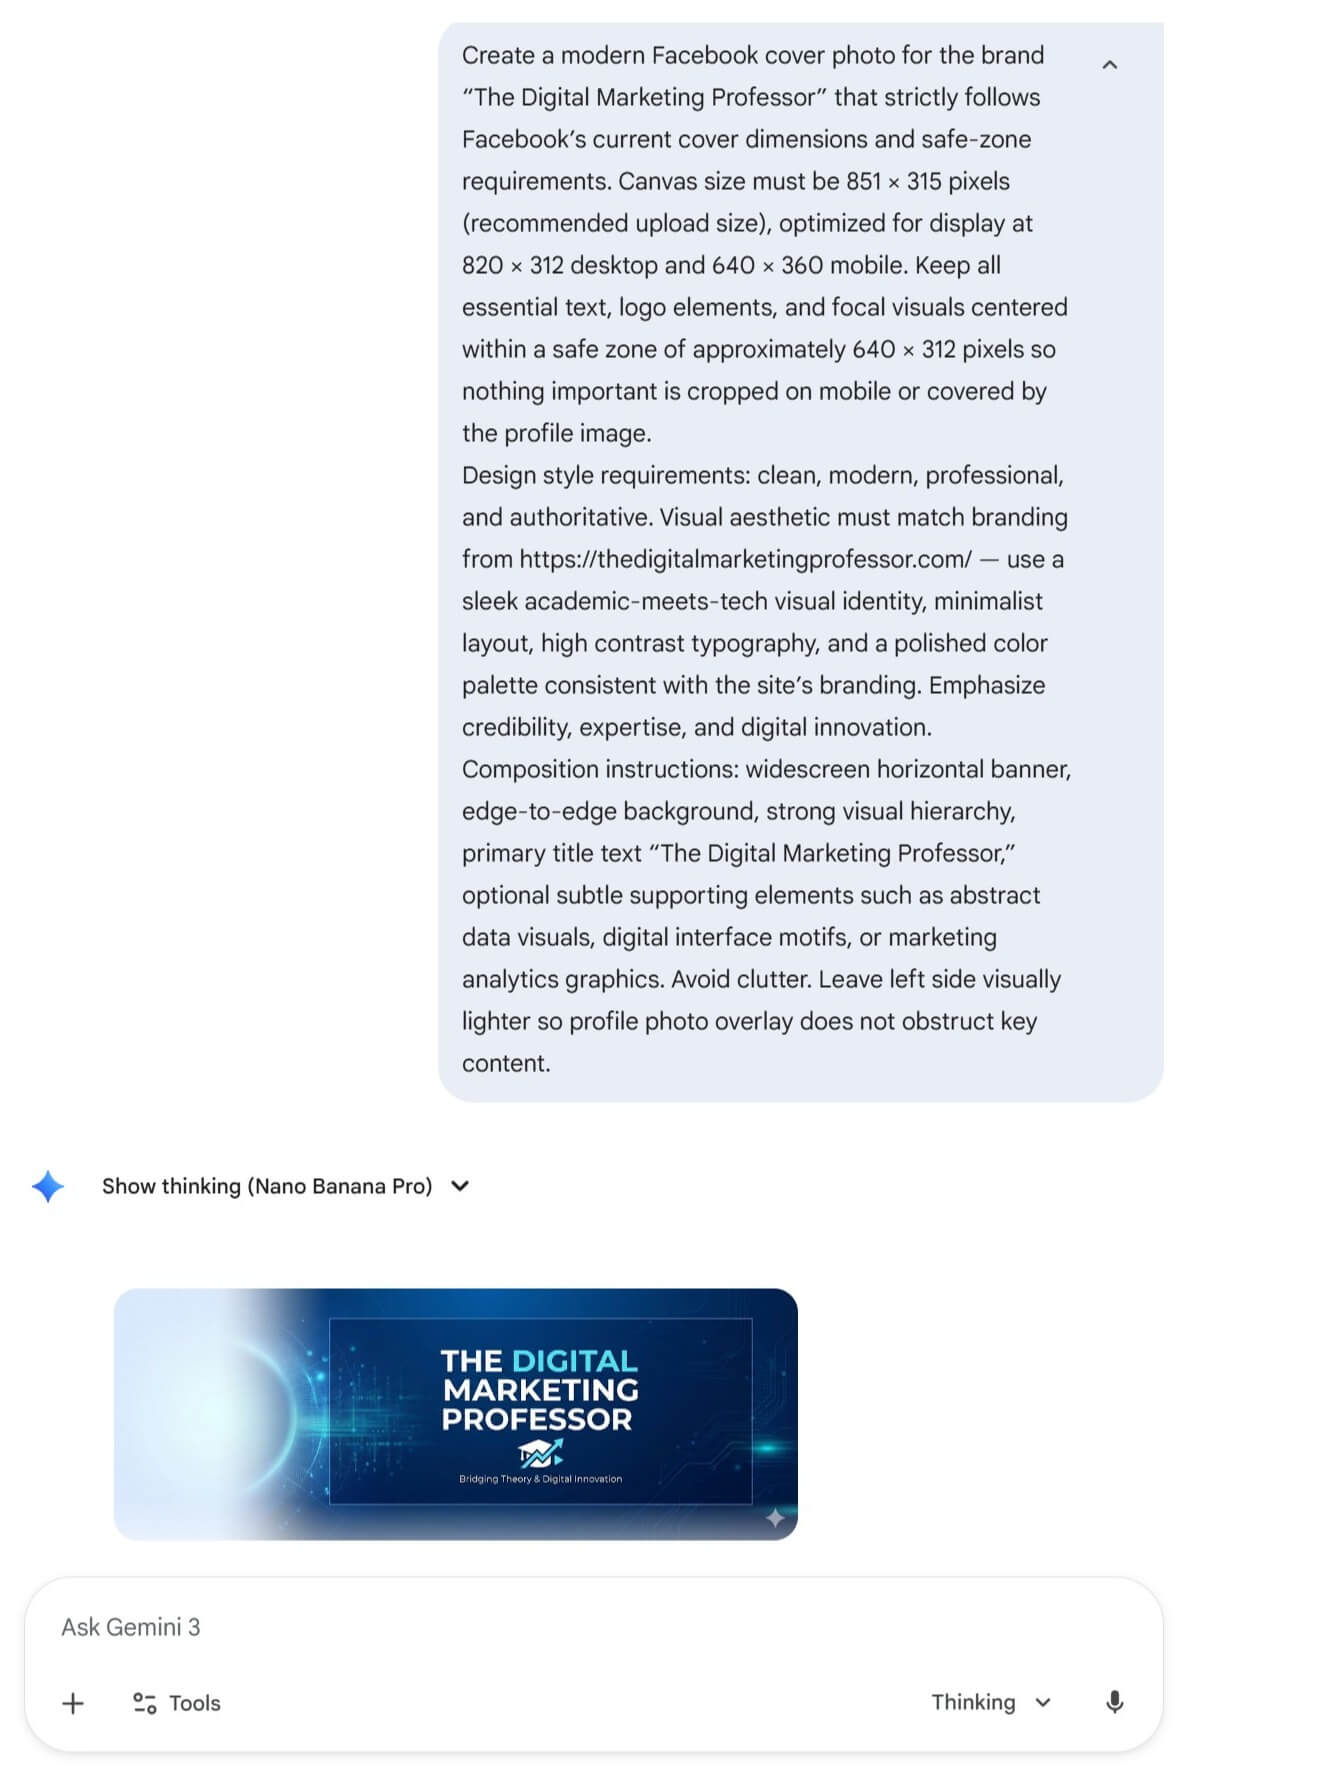
To generate a professional, on-brand profile image using Gemini, start by having any AI chatbot write your image prompt for you. This step helps you build a more precise description than you might think of on your own. Tell the chatbot your brand name, niche, preferred colors, style, tone, and any visual elements you want included. Ask it to format the prompt specifically for an image generator and to optimize it for a square composition since Facebook profile photos display as circles.
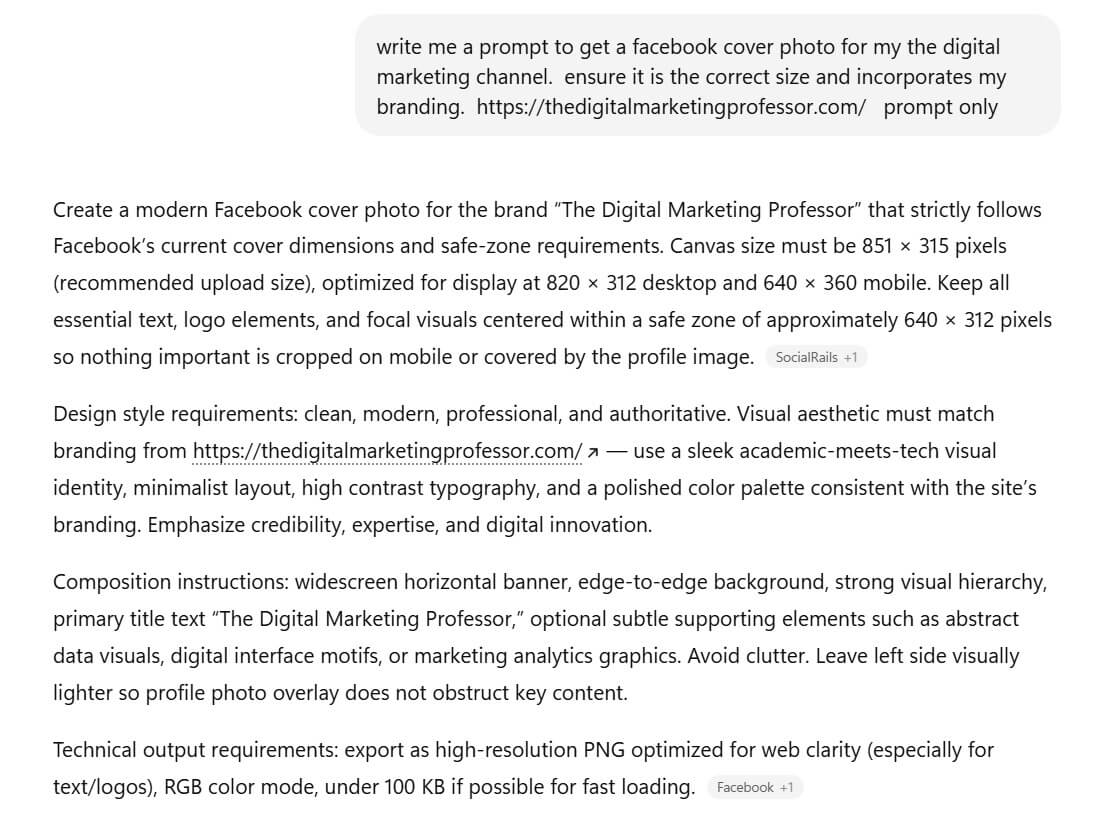
Once your prompt is ready, open Gemini and paste it into the image generation tool. Before generating, make sure your prompt includes these essential elements:
- Brand name or initials you want visible
- Primary color palette (include HEX codes if possible)
- Style direction (minimalist, futuristic, academic, tech-focused, etc.)
- Background preference (solid, gradient, abstract, pattern)
- Composition centered subject with clear margins so nothing is cropped in a circular frame
- Resolution request high-resolution square image
After Gemini generates the image, review it carefully at small sizes. A good profile photo must remain clear and recognizable even when displayed as a tiny thumbnail. If anything looks cluttered, regenerate with instructions like “simplify,” “reduce detail,” or “increase contrast.” Continue refining until you have a clean, bold image that visually matches your cover photo and overall branding.
How To Create A Facebook Cover Image With Canva AI Image Generation Tools
If you do not have a pro version of Gemini or ChatGPT you can use some of the built in AI Image tools in Canva.
We now need to add a profile and cover photo. If you have these graphics available great. If not open up Canva.com and click create a design:

Then navigate to Facebook Cover to ensure the proper dimensions. You can also search for Facebook Cover as shown below:

Option 1: One easy way to get a cover photo for your Facebook page is to start by searching for a template that aligns with your brand. In Canva, try searching for a “content creator” template or something specific to your channel’s theme, like “thrifting,” “coffee,” or any niche that represents your content. This will give you a set of pre-made designs tailored to your style, which you can easily customize. Go through the template and change out the info, adjusting colors, fonts, and layout to make it fully suit your page.

Option 2: A more fun way to get a Facebook cover photo is by using the AI image generators built into Canva. Start by visiting your favorite chatbot to create a description for the image you’d like to use. You may need to specify the size of the image, as I did in my prompt, to ensure it fits perfectly. For an even more tailored look, consider adding specific color codes to match your brand’s style. This approach allows you to create a unique, on-brand cover photo that stands out.
Here’s what I generated from my ChatGPT Plus account:
“A modern Facebook cover photo that highlights social media, AI, and digital marketing. It features icons for popular social media platforms like Facebook, Instagram, and LinkedIn, with neural network patterns and a subtle robot graphic to represent AI. Digital charts and graphs are incorporated to represent marketing. The primary color is #558acd, with hints of #f99551 and #f66b7e for added visual interest. The headline reads ‘Digital Marketing & AI’ in bold, modern text. The style is sleek and professional, with a digital blue and tech-focused aesthetic.”
I will now take this prompt and enter it into one of Canva’s image generators.
IMAGEN from Google:
Click on the APPS section of Canva on the left toolbar. Search for image and click on Imagen which is Google’s advanced image-generation technology.

Click OPEN on the App:

Next, you’ll need to enter your prompt into Canva’s text-to-image tool. Since there’s a 350-character limit, I used ChatGPT to rewrite my original, longer prompt, trimming it down to fit within this constraint. While it’s helpful, the shorter version meant losing some of the finer details from my original description. To ensure the generated image matches your vision, focus on prioritizing essential elements in your prompt, like colors, key icons, or specific graphics.

Here are the images generated by Imagen:

Here are the generated images from the shortened prompt, and they’re just okay. With the details lost in trimming the description, the images don’t fully capture the look I was aiming for. I also had to drag and stretch them to fill out the Facebook cover dimensions, which affected the overall quality. To complete the cover photo, I could add a title:

However, with the current images not quite hitting the mark, I’ll give it another try with two more image generators to see if they capture the vision better.
Magic Media
Let’s try the “default” image generator in Canva called Magic Media.

Magic Media works like Imagen. I simply put in the shortened prompt as Magic Media has a character limit as well. I left out dimensions since Canva allows you to select a horizontal orientation, saving space for key details like colors, graphics, and title text. This approach meant sacrificing some details, but it ensured the prompt captured the main design vision within the limit. Click Generate Image to see what you can get.

Here is the output I received—four sample images based on my prompt. They’re just okay and didn’t fully capture the detail I wanted, likely due to the character constraints. I selected one of the samples, stretched it out to fit the cover photo dimensions, and added a title similar to what I used before. While this approach works for now, the limited details in the prompt meant some visual aspects were simplified.

Dall-E
Let’s try it one more time with Dall-E. DALL-E is an advanced AI model developed by OpenAI that generates images from text prompts and is built into Canva. Go to APPS and search for Dall-E then load the app.

Click Open:

Enter your shortened prompt and click Generate.

The DALL-E graphic turned out just okay—not quite capturing the level of detail or style I was aiming for. If you’re looking for something more refined, it’s likely better to try generating the image in ChatGPT instead. ChatGPT allows for more specific, guided prompt adjustments, giving you a better chance of getting exactly the visual you want

ChatGPT & Dall-E
After ChatGPT helped me craft a detailed prompt earlier in the article, I used it to generate an image through DALL-E, which brought my ideas to life. The first image captured the essence of social media, AI, and digital marketing, but I wanted a few adjustments to better fit my vision. ChatGPT made the modifications, refining elements like color and layout. You can see my prompt and the image generation below. You can click on the image to make it bigger and edit it.

Once I was satisfied with the updated version, I used ChatGPT’s built-in image editor to make final tweaks, ensuring the design aligned seamlessly with my article’s theme. You can see that I selected something in the image that I did not like and asked ChatGPT to remove it. This process saved time and delivered a polished, custom image ready for publication.

Here is the final image. Not perfect but good enough for a quick easy cover image.
Next Step: Create A Profile Image
With the cover image ready, the next step is setting up an eye-catching profile photo that complements it. Your profile photo will serve as a recognizable icon across Facebook, so it’s essential to choose one that aligns with your branding. Here’s how to do it:
- Pick an Image Generator
To create a unique profile photo, you can select your favorite AI image generator. Tools like DALL-E, Midjourney, or Canva’s AI suite allow you to design a custom image that matches the look and feel of your cover photo. For consistency, use a similar prompt to your cover image, adjusted for a square format. - Use One of Your Existing Images
Alternatively, if you already have a photo that represents your brand well, feel free to use it. Choose a high-resolution image that’s clear and engaging even at smaller thumbnail sizes. Make sure it has strong visual elements to stand out. - Upload and Fine-Tune
Once you’ve selected or created your profile photo, upload it to Facebook. Adjust cropping and centering to ensure it displays perfectly in both full and thumbnail views. This is a key branding opportunity that enhances your page’s cohesiveness.
Setting Up Your Facebook Page
With your cover and profile images ready, simply follow the arrows in the image below to upload each to your Facebook Page. You can adjust the position as needed, then click “Next” when done.

Next You want to click skip when it asks to connect whatsapp.

You can then invite friends if you want to.

You then have notification settings you can choose. Once selected, click Done.

You now have a basic Facebook page set up! Click the tour button to see some of the more important part of your page: